Assembly Section
In the Assembly section of the Fabrication Manager, you can easily handle your assemblies. Here's what each column represents:

- Assemblies: Clicking on the Assembly button will navigate you to the assembly tab and shows you all assemblies available in your project.
- Name: This column lists the names of all assemblies in your project.
- State: Shows the current state of the assemblies (only works in workshared documents).
- 3D Ortho: Clicking this
 icon takes you to the 3D Ortho view of the selected assembly.
 - Sheets: Clicking this
 icon within the Sheets column
  allows you to jump to the sheet(s) associated with that assembly.
 - Schedules: Clicking this icon
 within the Schedules column
  lets you jump to the schedule(s) associated with that assembly.
 - Temporary Hide / Isolate: Clicking this icon
 takes you to the hidden or isolated 3D view associated with that assembly.
 - Colors: The Colors column
 represents randomly generated colors applied to the assembly. You can change these colors by clicking on the desired color under the Colors column.
 - Total Number of Assemblies: This number represents the total count of assemblies in your project.
- Here are the features available for dealing with assemblies and packaging within the fabrication manager:
- Delete Assembly: To delete a selected assembly, click on the assembly in the Fabrication Manager and then click the delete
 icon.
icon. - Remove From Package: To remove assemblies from an existing package, select the assembly you want to unpackage in the Fabrication Manager and click the unpackage
 icon.
icon. - Add to Package: To add the selected assembly to an existing package, click on the assembly, and then click the add to package icon
 . A popup will appear, allowing you to select the package where the assembly should be added. After selecting the package, click OK.
 - Create Package: To create a package from a selection of assemblies, first, select the assemblies you want to include and click the create package icon
 . You'll be prompted to enter a name for the package, and once you're done, click OK.
 - Combine Assemblies: If you want to combine multiple assemblies into one, select more than one assembly from the list in the Fabrication Manager, and then click on the combine assemblies icon
 .
.
Simplified Access to Assembly Functions:
To use these assembly functions, follow these easy steps:
- Select the assembly or assemblies you want by clicking on them.
- Right-click with your mouse.
- A menu will appear with various options to choose from.

- Change State: This option allows you to change the state of assemblies, but it works only for documents you're actively working on together with others (workshared documents).
- Rename: Use this option if you want to give a new name to the selected assembly.
- Rename (Advanced): For more advanced renaming, including adding prefixes, numbers, names, and suffixes.

- To Selected: : Pick this if you want to rename only the assemblies you've chosen specifically.
- To All: If you want to rename all assemblies on your current sheet, go for this option.
When you choose any of the renaming options, a pop-up window will appear. You can customize your renaming settings as follows, first note that each choice will remain inactive unless you click the checkbox next to it:

- Prefix: Type in the prefix you want to add to the assembly name.
- Number: Specify the starting number for renaming.
- Name: Define the new name for your assemblies.
- Suffix: Specify the suffix for the new name.
- Apply Prefix / Number to Schedules: Check this box if you want the new prefix and number to apply to schedules as well.
- Apply Prefix / Number to Sheet Number: Mark this box to add the new prefix and number to the sheet number
- Apply Assembly Name To Sheet Name: Check this box if you want the assembly name to be used as the sheet name.
Once you've set your preferences, you can either click the "OK" button to apply the changes or the "Cancel" button if you wish to discard them.

- Set Color: To change an assembly's color, click on the desired color in the "Colors" column.
- Select All: Click "Select All" to choose all available assemblies in the list.
- Deselect All: Click "Deselect All" to unselect all previously selected options.
- Select Assembly: : If you want to highlight a specific assembly, right-click on it and choose "Select Assembly." The chosen assembly will appear highligted in blue in the project view.
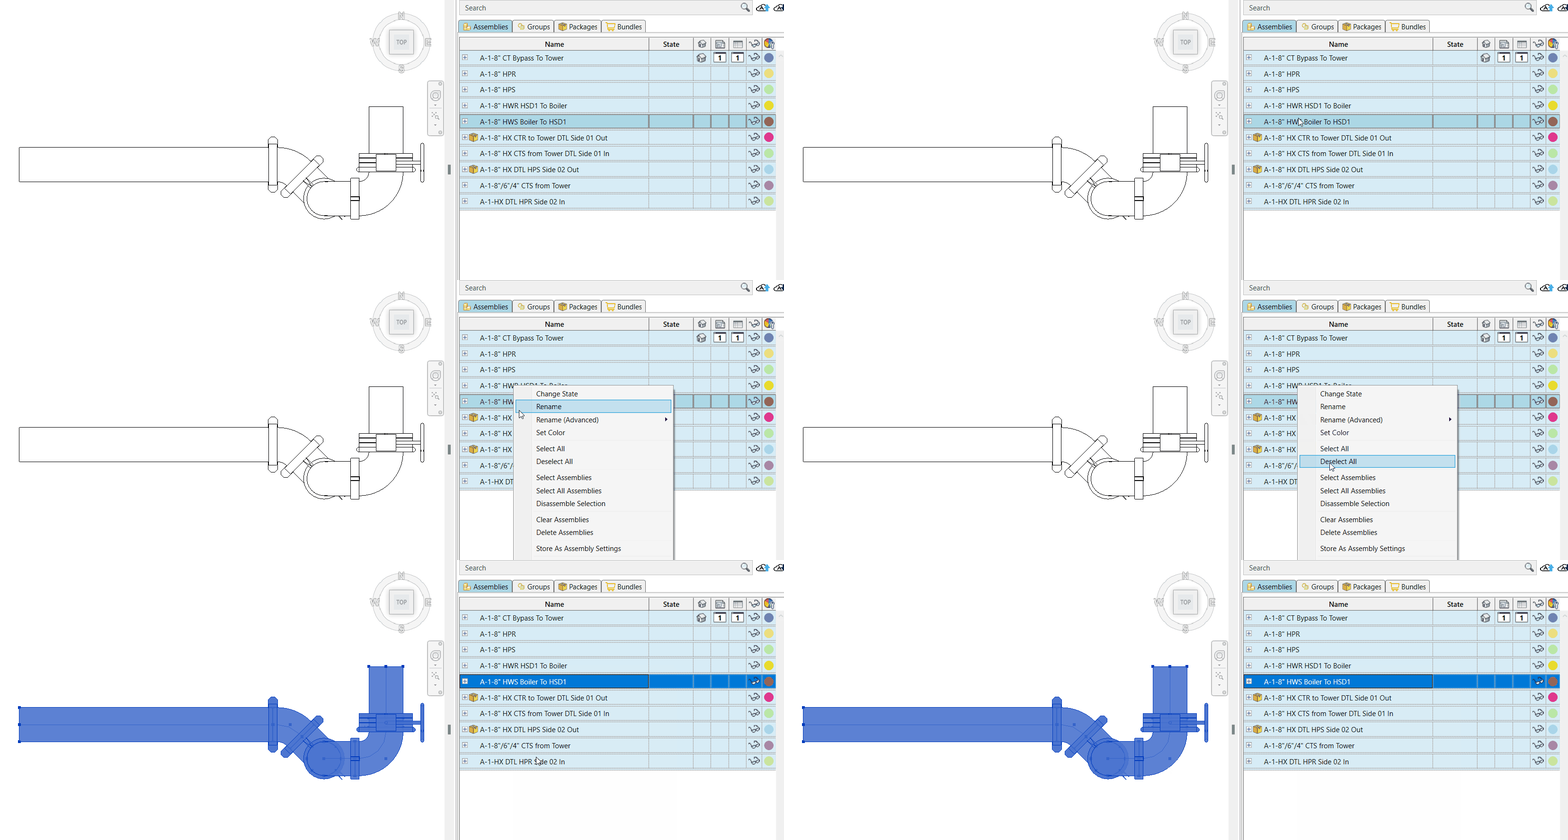
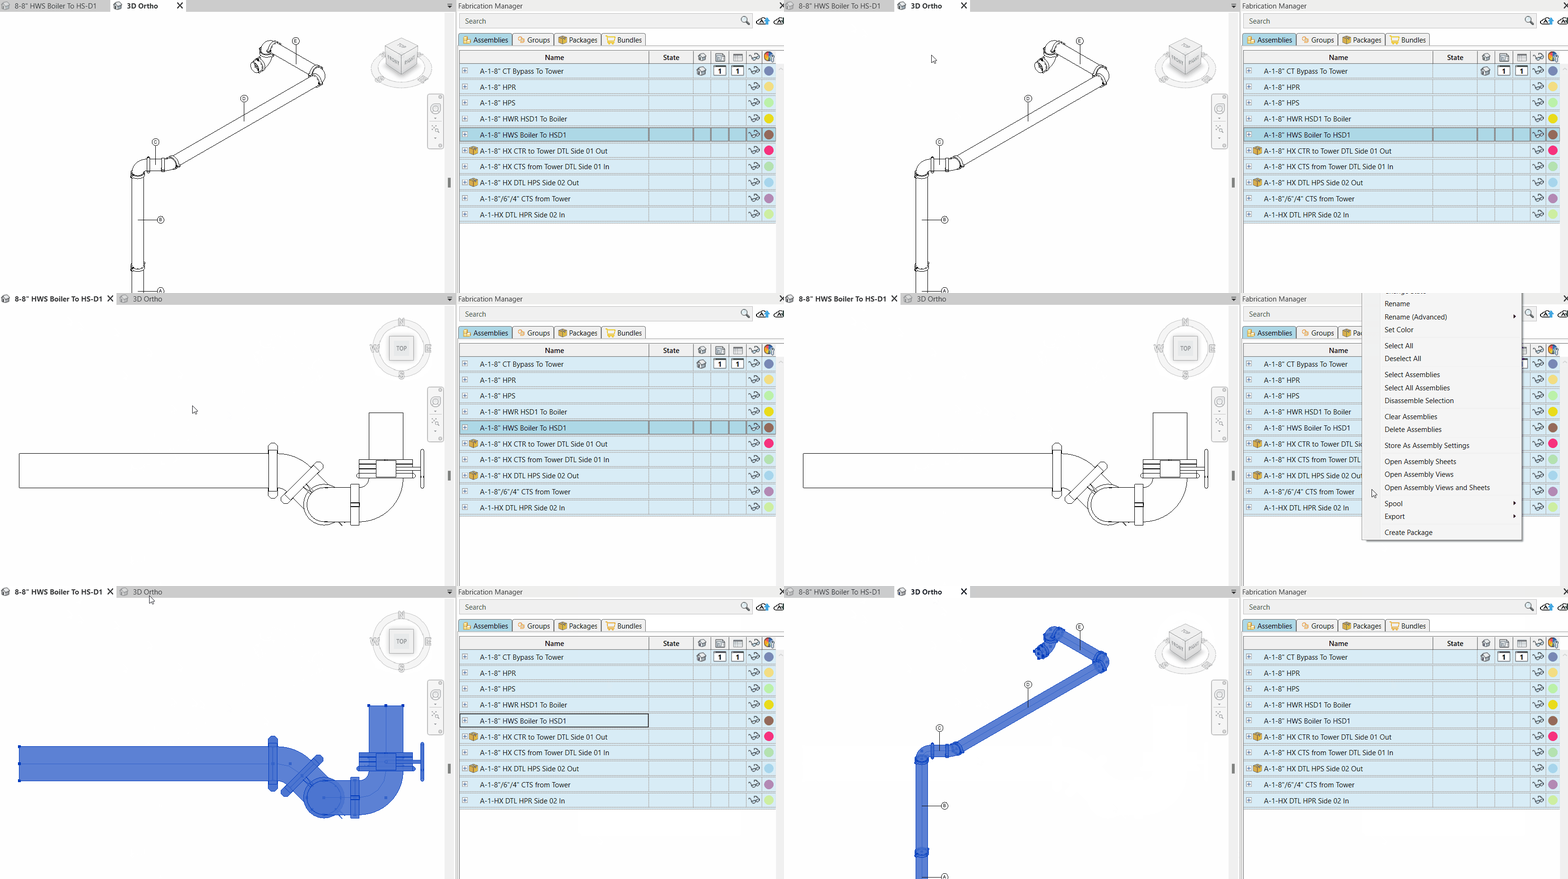
- Select All Assemblies: For a more efficient workflow, use the "Select All Assemblies" option. It lets you choose all the assemblies in your project at once, highlighting them with blue in the project view.
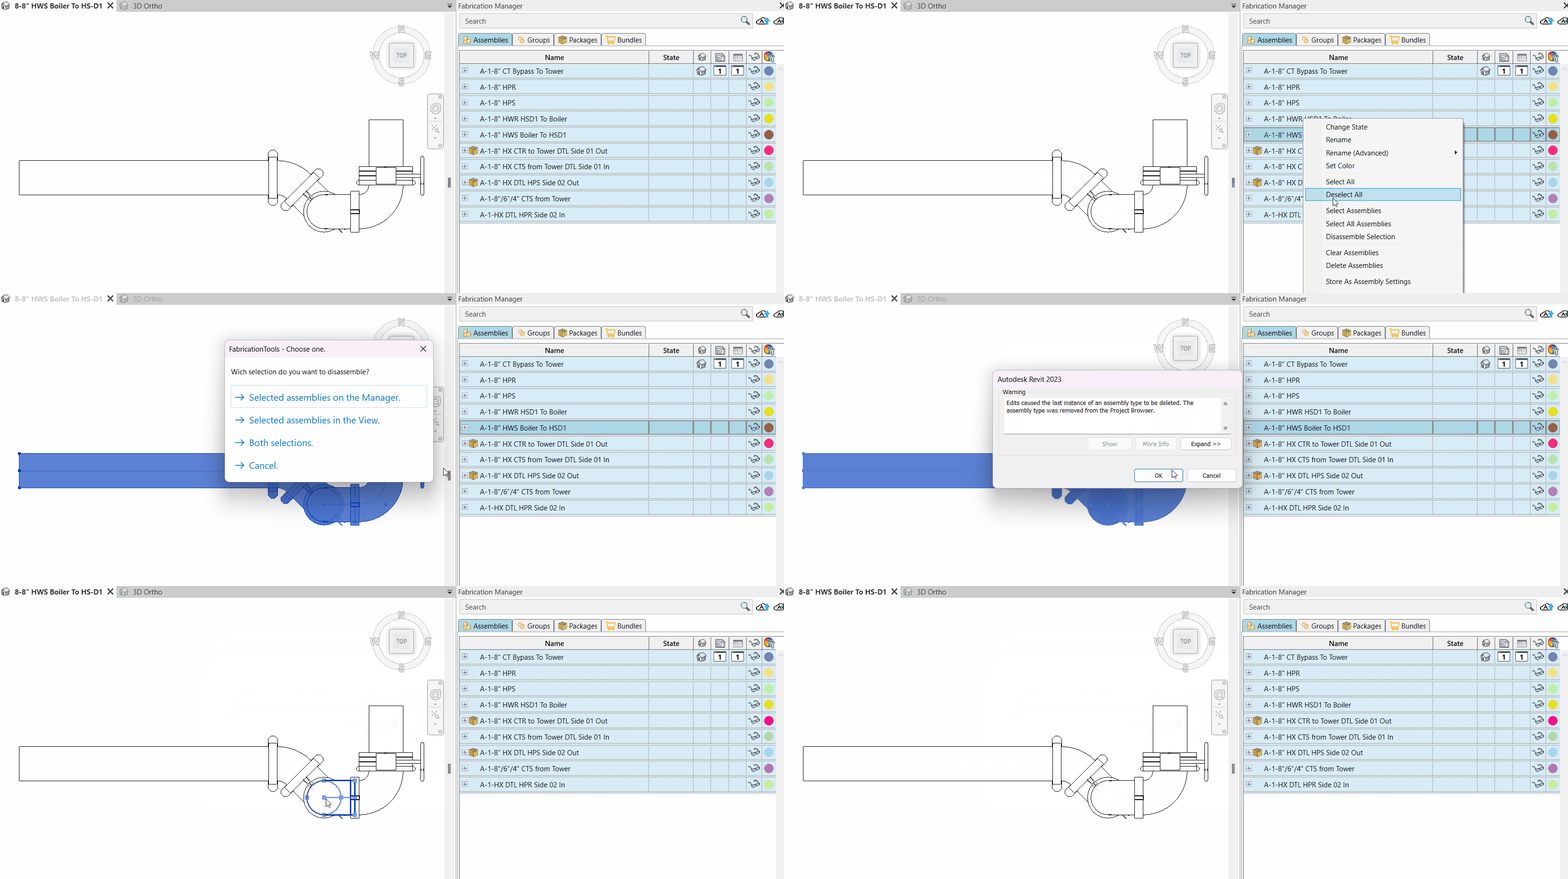
- Disassemble Selection:If you need to break down multiple assemblies into their individual components, use the "Disassemble Selection" option. It's handy when you want to break down multiple assemblies into their individual components.
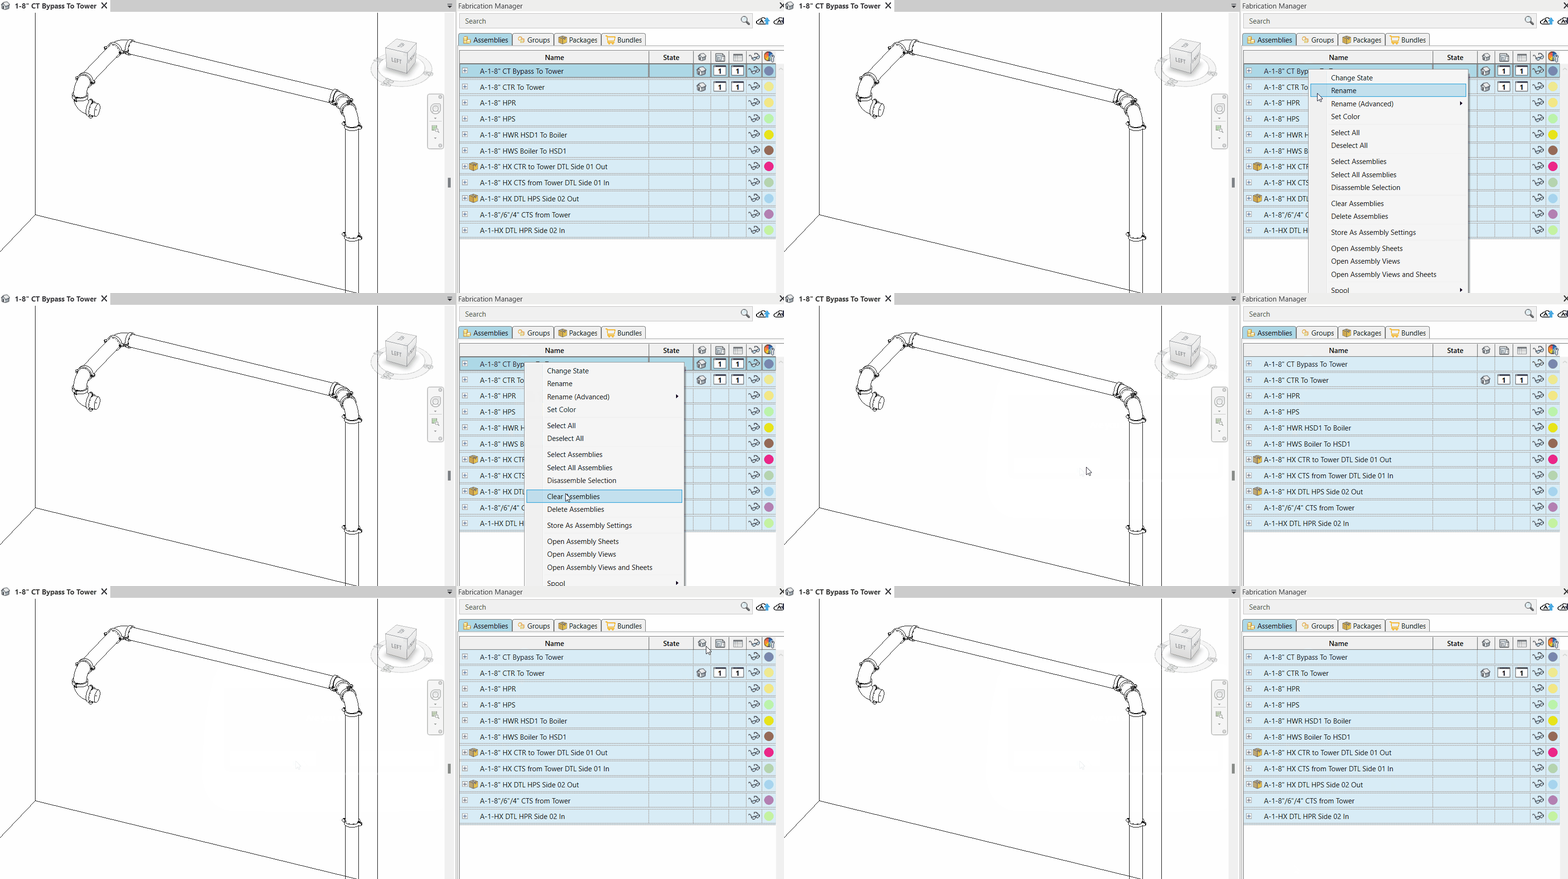
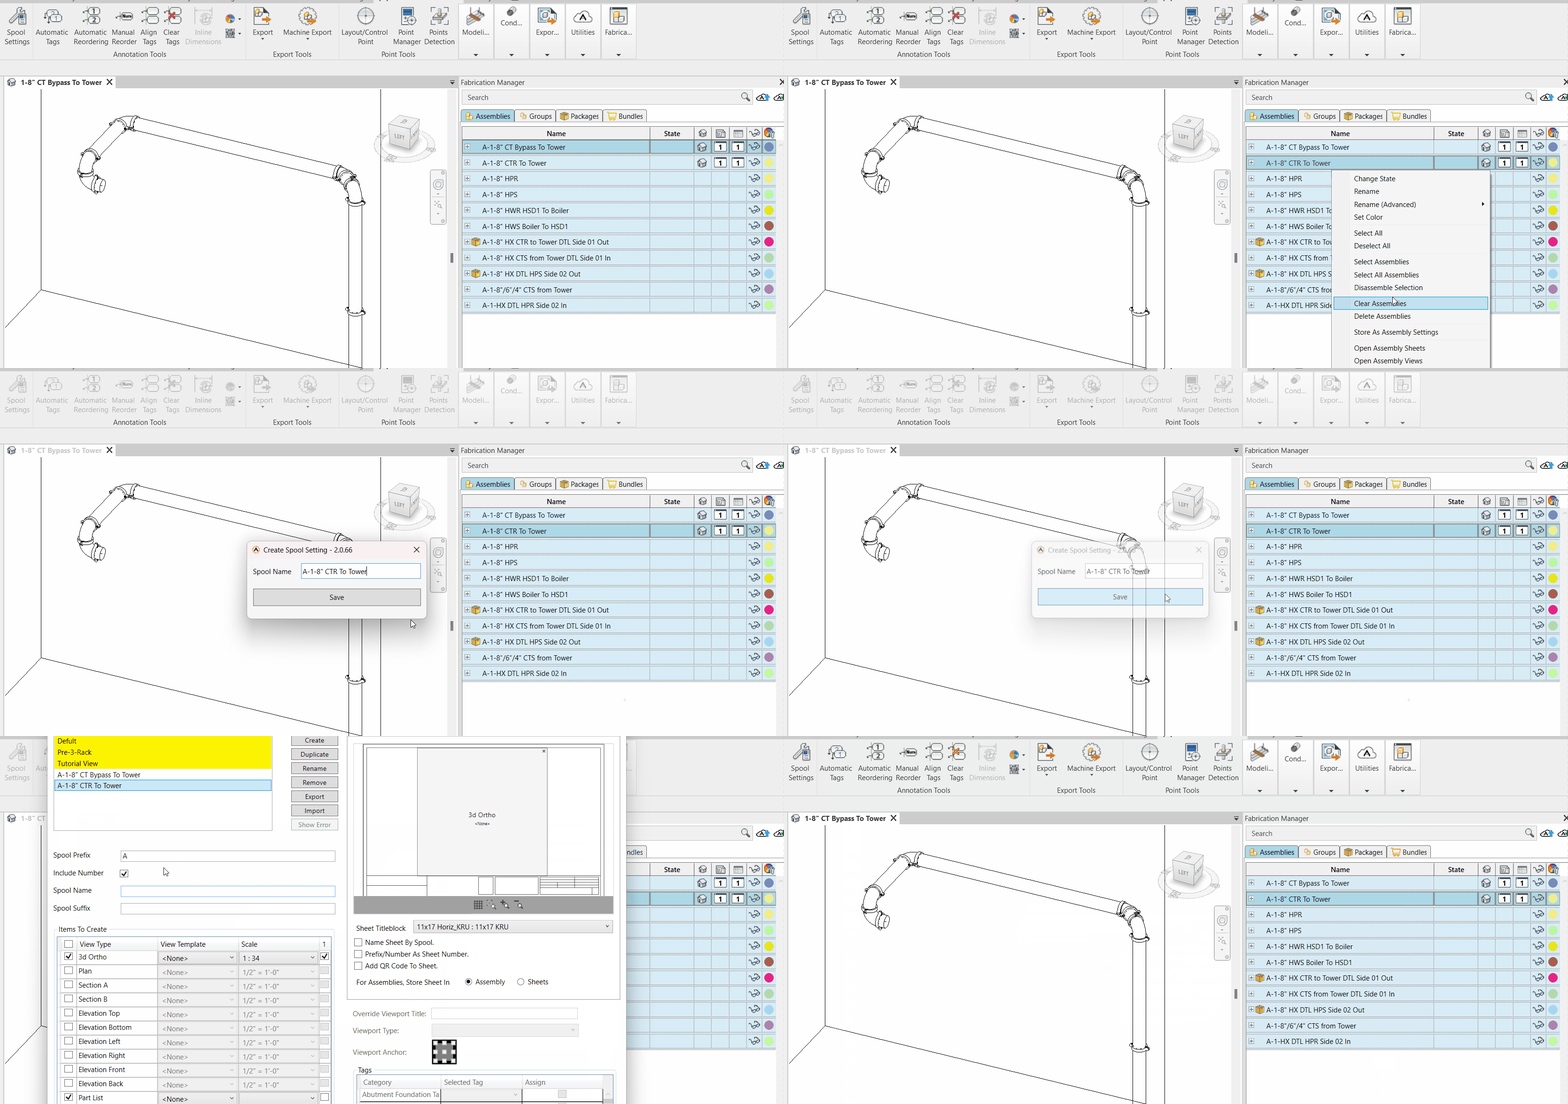
- Clear Assemblies:The "Clear Assemblies" option is a way to remove all views and sheets linked to an assembly without deleting the assembly itself. If you want to keep the assembly structure but get rid of its associated data, select the assembly and use this option to achieve that.
- Delete Assembly: The "Delete Assembly" option lets you delete the assembly you've selected in the Fabrication Manager. It's useful when you want to remove specific assemblies from your project.
- You can also select and delete multiple assemblies at once, which can save you time when you need to remove several assemblies.
- Store Assembly Setting: The "Store Assembly Setting" feature helps you save assembly settings for future batch spools. This makes your work more efficient when you need to apply the same settings to multiple assemblies.
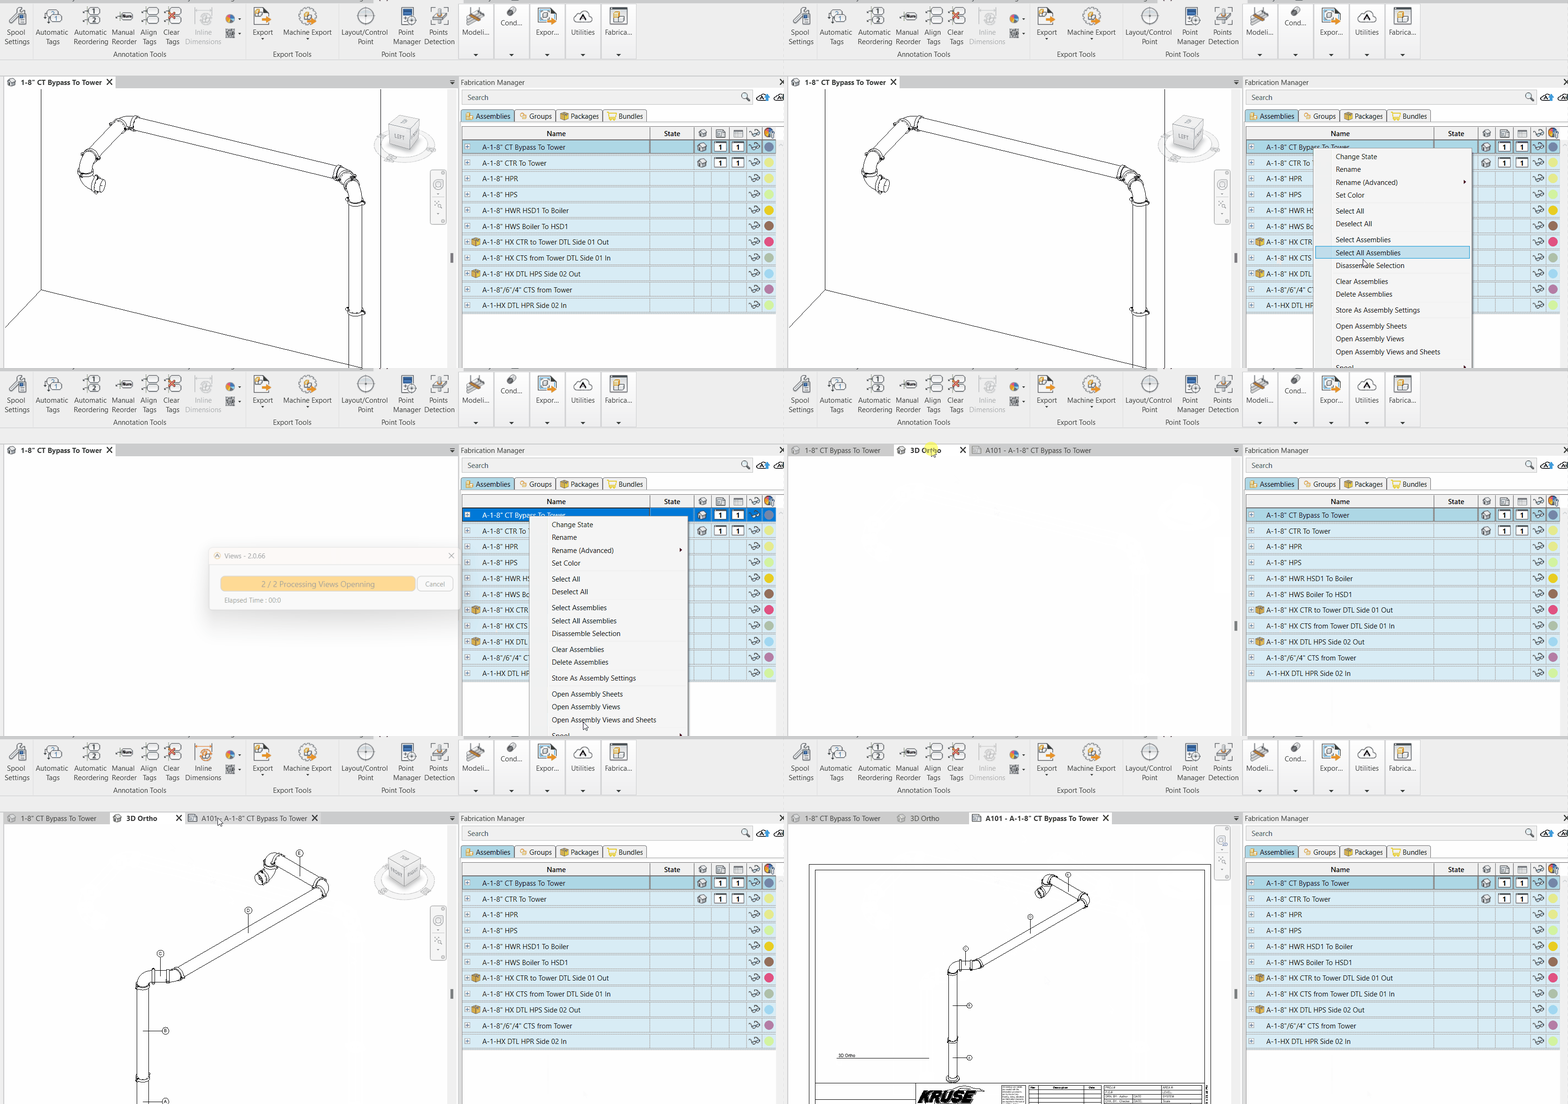
- Open Assembly Sheets:With the "Open Assembly Sheets" option, you can view the assembly sheet of a selected assembly. Right-click on the assembly and choose this option to access the assembly sheet for reference or editing.
- Open Assembly Views: The "Open Assembly Views" option allows you to open the assembly views linked to a selected assembly. Use this to review and make edits to assembly views as necessary.
- Spool: Spooling assemblies can be done in two ways: directly or by selecting saved setting.

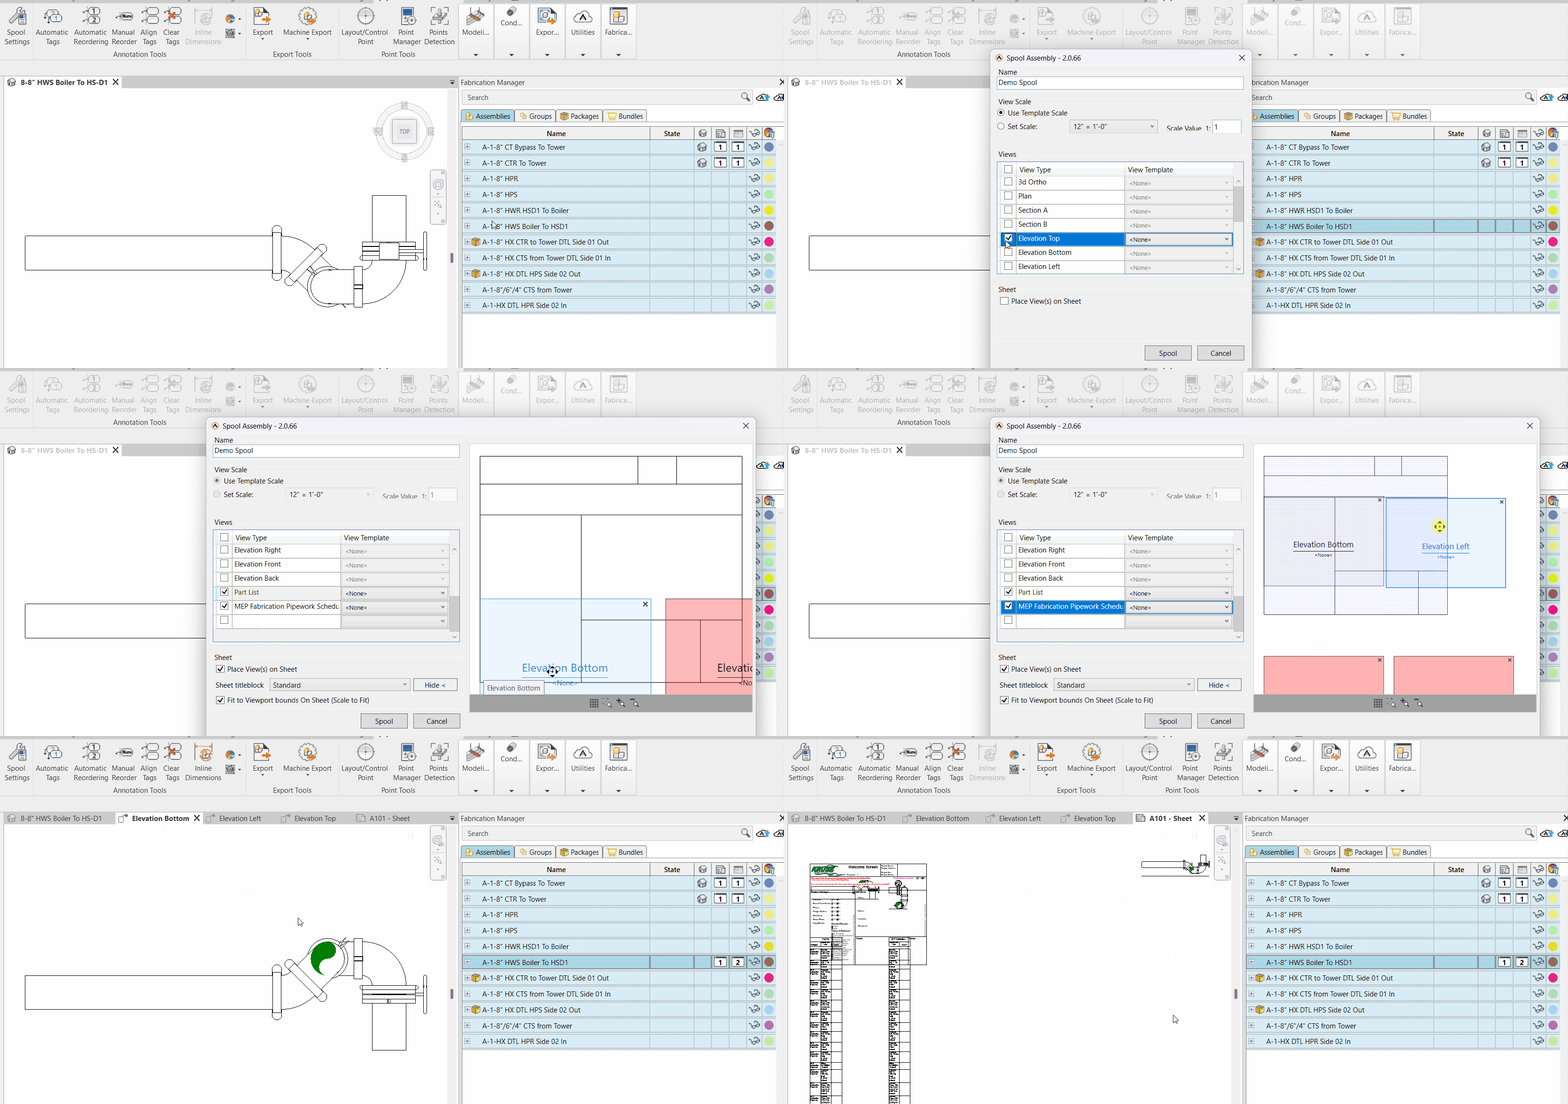
- Spool Assembly Directly: If you want to create a new spool from scratch, here's how:
- Right-click on the assembly you want to spool.
- Choose "Spool" and then select "Spool Assembly Directly."
Complete the Following Information:

- Name: Provide a name for the spool you're creating.
- View Scale: Choose the scale for your project. You can use a template scale or define a custom one.
- Views: Select the specific views you want to include in your spool.
- Sheet: If you want to place the views on a sheet, check the "Place View(s) on Sheet" box.
- Sheet Titleblock: Pick a titleblock from the available options.
- Preview: Use this feature to see how the sheet will be structured and rearrange views as needed.
- Scale to Fit: Check the box if you want the viewport bounds to automatically adjust to fit on the sheet.
- Save Setting : Click "Spool" to start the spooling process for the assembly, or select "Cancel" if you wish to discard the changes.
- Spool Assemblies Using Saved Settings: To create a spool using previously saved settings, just follow these easy steps:
- Select the assembly you want to spool.
- Right-click on the assembly.
- Choose "Spool" and then "Spool Assemblies Using Saved Settings."
- A pop-up will appear, where you can pick the saved spool settings you want.
- After selecting, click "Create."
- Export: You can export your assembly to different supported machine types:
- Export Selected Assembly Schedules to Excel: Choose this to export specific assembly groups to Excel, creating a Bill of Materials (B.O.M).
- Export To TigerStop: Use this option to export selected assemblies to a TigerStop.
- Export To RazorGage: Select this to export chosen assemblies to a RazorGage.
- Create Package: To make a package from selected assemblies, follow these simple steps:
- Open the "Create Package" feature.
- In the pop-up that appears, enter the package name.
- Click "Save.
Created with the Personal Edition of HelpNDoc: How to Protect Your PDFs with Encryption and Passwords