Duct Bank Settings
Description
Modify/Set settings of the duct banks this way also provides ways to import and export settings
Place Duct Banks on selected fabrication parts based on settings. Place fabrication part hanger onto selected fabrication parts based on spacing or number of hangers per element.

Step-by-Step Guide
- Access "Duct Bank Setting": From the toolbar, click on the "Duct Bank Setting" icon.
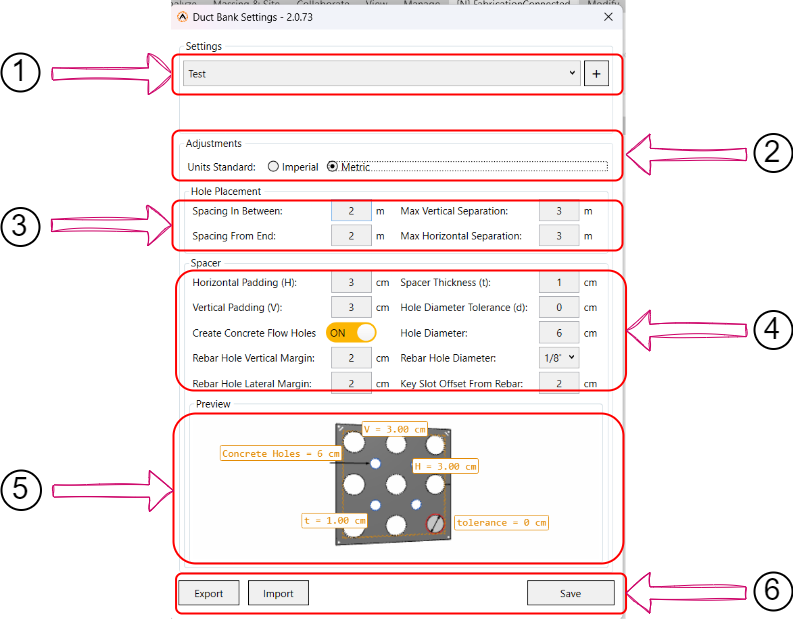
- Customize Duct Bank Settings: The Duct Bank Setting window will open, providing options to customize your settings. Here's what you can adjust:
- Setting's Profile: Choose from an existing setting profile in the dropdown or add a new one by clicking the
 icon and entering a new setting profile name.
 - Unit Standard: Specify the unit standard based on your project's needs, whether you prefer imperial or metric.
- Hole Placement Settings: Customize hole placement with the following options:
- Spacing in Between: Set the uniform distance between each spacer plate.
- Spacing from End: Define the offset distance from the center point of the spacer to the nearest endpoint of the conduit.
- Max Vertical Separation: Enter the maximum vertical separation. If this distance is exceeded, conduits will be grouped separately.
- Max Horizontal Separation: Set the maximum horizontal separation. If exceeded, conduits will be grouped separately.
- Spacer Parameters: Edit and specify spacer parameters.with the following options:
- Horizontal Padding: Specify the horizontal padding value for the duct bank.
- Vertical Padding: Specify the vertical padding value for the duct bank.
- Create Concrete Flow Holes: Enable this option if you want to add concrete flow holes to your duct bank.
- Rebar Hole Vertical Margin: Configure the vertical margin for rebar holes.
- Rebar Hole Lateral Margin: Configure the lateral margin for rebar holes.
- Spacer Thickness: Specify the thickness of spacers.
- Hole Diameter Tolerance: Set the tolerance for hole diameter.
- Hole Diameter: Define the diameter of holes.
- Rebar Hole Diameter: Specify the diameter of rebar holes.
- Key Slot Offset From Rebar: Set the key slot offset from rebar.
- Preview: Use this option to visualize your settings in a 3D model and observe real-time changes in the model. You can also manipulate the model to view it from various angles.
- Manage Setting State: This section likely allows you to manage different states or versions of your duct bank settings.
- Export: Click on "Export" to save your current settings as a JSON file on your local device.
- Import: Use the "Import" button to import and apply a setting file from your local device.
- Save: Click the "Save" button to save your duct bank settings, ensuring that any changes you made are retained for your project.
Import Settings File
You have the option to import settings from a JSON file stored on your device. Simply click on the "Import" button and locate the desired file from your device's storage. This allows you to easily apply previously saved settings to your project.
Created with the Personal Edition of HelpNDoc: Maximize Your Documentation Capabilities with a Help Authoring Tool